Friday, April 13, 2012

The Curtain Rises

Half of my projects from the last couple of weeks have not gone according to plan.  Don't you just hate that?  Ah well, trial and error!

Today I bring you one of my successful projects:  a roman shade style curtain made from a bed sheet.  (I made a similar curtain from scratch and that one was less successful as my sewing skills are very basic right now).

In our kitchen we had some of those horrific vertical blinds.  I never closed them and, as a result, the whole thing tilted to the right.  It was such an eyesore!  So, I finally decided to tackle making curtains for it.  This is where my genius struck:  instead of buying all the fabric, which let's face it can be pretty expensive, I'd buy an inexpensive flat sheet!  (Note, this will only work if the size you want for your curtain is close to that of a bed sheet.  I used a full sized flat sheet.)


Because the flat sheet, unlike raw fabric, is already hemmed all around, this project was very simple and straightforward.


Supplies needed:
-Flat sheet larger than the opening of your window/door
-Thread in a matching color
-Sewing needle and scissors
-Ribbon for the ties (I used ribbon that was 1-1/2 inch wide and 2-1/2 yards long)

Process:
  1. Take the top of the flat sheet on the backside and cut a whole from the top of the sheet along the inner seam to the hem.  This will create the hole where the curtain rod will run through.  Picture 2 shows this hole.  Be careful not to cut over the top of the sheet as you don't want the hole visible from the front side of the curtain.
  2. Repeat on the other side.
  3. Hem both of the raw edges by hand to complete the casing for the curtain rod.  I did this by hand and wasn't too worried about how neat and even it looked as it isn't visible from the front of the curtain.  My goal was simply to prevent unnecessary fraying.  Picture 2 also shows the raw edge after it has been hemmed.
  4. Find where you want to put your ribbon ties.  To do this, I folded the sheet in half vertically, and then in half again.  I marked where on the curtain I wanted the ribbons, unfolded the curtain and tacked the ribbon on by folding it in half over the top of the sheet.
  5. This part was the hardest because you have to sew the ribbon on to the sheet without accidentally sewing the rod casing closed.  I suppose you could also glue it on, it's really up to you.
  6. After it's been sewn on, go ahead and hang it up and tie the ribbon to pull the curtain up.  And you're done!
Hopefully these instructions weren't too confusing!

Up next, the pros and cons to the wine bottle lanterns I made and hate.  :)

Happy Crafting!

Thursday, March 29, 2012

My Melting Heart

In just a couple of weeks, my husband and I will be celebrating the fifth anniversary of our first date.  I'm quite excited...I love milestones!


As I always make my husband a sappy gift for all of our gift giving occasions, I had to find something for this.  It took a while, but I finally figured it out:  melted crayon canvas art.  Melted crayon canvas art has been popping up all over Pinterest lately, so I thought I'd give it a whirl. 

I loved it!  It's simple, inexpensive and looks pretty awesome.

Melting Heart Crayon Art


Supplies:
Wax crayons
Canvas
Hair dryer
Glue (I used Tacky Glue)


Directions:
  1. Figure out your design.  I decided to do a heart (a little more complicated than some other shapes perhaps).  Because my hearts I draw freehand always look drunk, I used a cookie cutter to make a template.  I used a looped piece of tape to stick the heart where I wanted it on the canvas.
  2. I used a box cutter to cut the crayons into small pieces.  I didn't try to make the pieces the same size because I was looking for a less uniformed look.  I then used a small bit of tacky glue and stuck the pieces around the heart template.  I removed the paper heart and let the glue dry overnight.
  3. As you'll notice in picture three, I didn't cover my work area because my table is already covered in paint and glue and stuff, but if you don't have such a crazy table, lay some newspaper down because this part is messy!  I set the hairdryer on high heat, but low power and slowly worked around the heart paying attention to which direction I wanted the wax to drip.  I used the cool setting on my hairdryer to cool the wax before moving on to the next section.
And ta-da!  It's just that easy!

Until next time! 

Thursday, March 22, 2012

Bring on the Geek (Part the First)

Wow, sometimes life just gets kinda busy, huh?  I've been intending to write a new post ages ago, but never made it to the bottom of my growing to do list.  What have I been up to, you ask?  Well, my husband and I finally bit the bullet and ordered lovely bookshelves (and an unrelated wine cabinet).  I am over the moon to finally get my books out of boxes (they'd been boxed up for nine months and as a woman who holds a BA in English, that's the stuff of nightmares). 

I've also started planting flowers around our new home...hopefully they won't all die.  I've never before planted flowers, and all attempts my mother made to get me into the garden as a child/teen was met with staunch refusals from me.

In the midst of all this, I have started several projects, but not actually finished any.  But, I do have one that I can show you as the first of four parts.

I had originally intended this to be a stand alone gift for my husband on the occasion of the fifth anniversary of our first date.  But, I was too excited to wait, so I shared it with him and then decided to expand upon my idea.

You probably want to know what I'm talking about, huh?

Well, a while ago I stumbled on an image of a cross stitch that was a heart made up of Tetris pieces.  My husband LOVES Tetris, so I jumped at the idea of making this.  However, when I actually looked at the picture, I was dismayed to discover that many of the pieces were fake pieces (Tetris shapes, as you probably know come in specific arrangements of four blocks...this pattern called for using one and two block pieces and I'm too OCD for that).

So, I sat down and spent about three hours figuring out how to put the pieces together.  I made it more complicated by assigning a specific color to each piece, and obviously I didn't want two of the same color to touch.  (I'd originally made it even more complicated by having a yellow pieces and a purple piece and I HATE those colors together...so I didn't want them to touch either.  I simplified my life by changing purple into pink!)

Once completed, my Tetris heart was just over 1-1/2 square inches.  Then genius struck!  I would turn this, and three other geeky objects turned cross-stitch, into coasters!  I have an empty set of picture coasters that are perfect to use with small cross-stitched projects.

So, without further ado:

Geek Coaster 1:  Tetris Heart


It's not the greatest picture, but you get the, um, picture.  :)

 
Key
-Each colored square is a cross stitch in that color
-Thick black lines around the heart are double stranded black back stitch
-Thin black lines separating pieces are single stranded black back stitch
-Dotted lines are single strand back stitch in the color of the piece (i.e. pink Tetris piece means pink detail stitching; red Tetris piece means red stitching, etc.)

*NOTE:  Each back stitch was the length of two cross stitches, helped create the block look I was looking for.


Up Next:  Rubics Cube Geek Coaster...also, eventually I will make those wine bottle lanterns and make more crocheted loveliness!


Happy Crafting!

Friday, March 2, 2012

First Foray into Crochet

Among my many goals and resolutions for 2012, I vowed to learn two specific crafting skills.  The first:  machine sewing.  I haven't done much, but what I have done there has been enjoyable and successful...but more on that some other time.  The second:  crocheting. 

For my Christmastime birthday, my wonderful aunt got me two books on crocheting, one of which came with a hooks and various other crocheting tools (I still haven't figured out what some of them are for!)  Along with some yarn, I sat down and attempted to crochet a dishtowel.

And I failed.  Over and over again.  Each time I got to the first row (after the base chain, of course), my work started to look pinched and be way to tight.  I rarely made it to the second row.  I kept presenting my husband with my failed attempts and calling them my caterpillars, promising they would turn into butterflies eventually (metaphorical, of course, as I was trying to make dishcloths, not butterflies).

Finally, last Friday, after having abandoned my efforts for about a month, I sat down with my books, yarn, hooks and Youtube and finally (FINALLY!) had success.  I managed to do a couple small sample patches of both single stitch and double stitch.  And then I began a new dishcloth (using a new pattern since I still didn't understand the one from my book).  Incidentally, I'm way too proud of my dishcloth to actually use it and risk staining it. 

After finishing that, I leaped into crocheting a cowl.  I don't know if I simply misread the directions, used the wrong sized hook, or both, but my poor cowl turned out waaaay to small for my neck!  But, I did not give up hope as I have a sister-in-law and niece both of whom have smaller necks than me!  Though to aide in putting it on, I added a few buttons.  I think it turned out quite nicely (though I wouldn't blame them if they never wore it in public!)

My first attempt at the cowl having been slightly less than a success, I tried again with a different skein of yarn...this time instead of making 35 stitches, I made 80...and that did the trick!  Folks, I'm really hoping I made mistakes in reading the pattern, because I'd hate to think my neck is 45 stitches rounder than the necks for which the pattern was written!

In between my cowl efforts, I did pause and made four cute little hearts!  They were surprisingly difficult and required me to learn how to do a magic circle...as well as a slip stitch.  For those of you who know what this, you'll be delighted to learn I'm an expert at slip stitches as that's what I'd used to make those ill fated caterpillars!

Wow, that was quite long, wasn't it?  Well, here are some pictures to reward you for your reading all of that (and if you didn't, I won't hold it against you...I'm very long winded as you are beginning to learn!)


I would be remiss if I didn't give proper credit where it is due, so here it goes:

The cowl pattern came from this site:  Crochet Spot
The dishcloth pattern (for which I omitted the trim) came from here:  Homespun Living
The hearts pattern is from here (mine don't look quite right, but I'll get there!):  Flower Girl Cottage

And here I am wearing my new cowl!  It's not a bad picture if I do say so myself...and I'm not usually fond of pictures of me!


I'm sure there will be many more crochet posts in the future, but I think more immediately, you can look forward to a designed-by-me cross stitch that I am making for my husband and wine bottle lanterns (hopefully I get around to doing those soon!)

All the best!

Friday, February 24, 2012

Sew Organized!

First, let me apologize for the pun in the title.  I have a horrid hatred of puns...and yet I can't avoid using them!  I should probably seek psychological help (though to be fair, I need help for many other reasons that have nothing to do with my love/hate relationship with puns).

Today I knocked out a project that has been sitting on my "To Do List" for a few weeks:  A Spool Holder.  Spool holders I've seen at the store are just simply too expensive for my novice sewing self.  Once all is said and done, I think the project cost me about $5 (not counting the paint, hammer, ribbon and glue which I had on hand).  I've seen several homemade versions on the net, but decided to freehand my own interpretation.

As a warning, when I made this again (and I'm sure I will as my spool holder only has 26 pegs and I'm sure to have more than 26 spools at some point in the future), I will do a few things differently.  I will point these "lessons learned from experience" as I go along.

Spool Holder
 
Supplies needed:
Nails (I used 1-1/2 inch nails...if possible, use longer nails)
A wooden board
Piece of paper as big as the front of your board
Paint
Hammer
Ruler


Process:
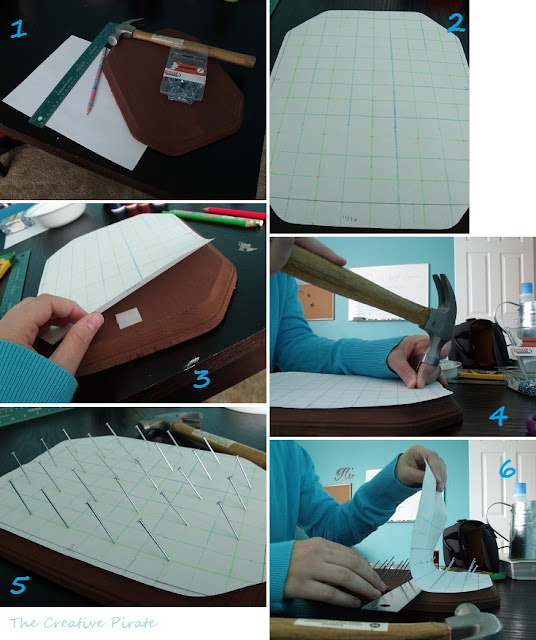
  1. Gather supplies and paint your board (picture 1).  Paint it whatever color you want, this is your project after all.  I choose am unexciting brown so as not to interfere too much with the colors of my spools, but that's just my take on the matter.
  2. Carefully trace the front of your board.  If your board is a funny shape like mine is, be careful when tracing.  After tracing the board, cut out your shape.  This will serve as your template for measuring nail placement.  Incidentally, if I were to do this all over again, I would use a basic square or rectangle.
  3. Using your ruler and pencil (colored pencils really help with this), mark out your squares.  Your goal here is to mark out where each spool will go and where it's nail belongs.  I discovered that most spools fit inside a 1-1/2 inch square.  Based on that, and my funny shaped board, here's how I made my template:
    1. I measured length and width of my board's surface.  Because it's a weird shape, I couldn't just start marking off a grid...first I had to figure out where to start my grid.  Those are the gray lines around the outside of my grid in picture 2.  
    2. Starting inside this new rectangle, I used a blue pencil to mark off 1-1/2 squares.  
    3. I used a green pencil to create lines 3/4 of an inch from each side of my squares.  This finds the middle of each spool's square.
    4. To make things easier for me, I used a red pencil to mark where each green line intersects.  These dots are where my nails will go.
  4. Picture 3 shows me carefully lining my template onto my board and securing it with tape.  This will keep the paper from slipping around while I'm hammering in the nails.
  5. Carefully  hammer in nails at each of your designated points (picture 4).  I hammered mine in at a slight angle since I will hang this on a wall and an angel will prevent the spools from slipping off.  However, I think my slight angle was a bit too big.  Next time, I'll be more subtle in my slanting efforts.
  6. Picture 5 shows how my board looked after I nailed in all the nails.  Note, you don't want to hammer the nails in to far.  Just nail them in until they are firm and don't wiggle around.  This doesn't take much!
  7. As I am going to eventually make several more of these, probably on the same kind of board because I like making my life difficult, I decided to save my template.  (Too much math for me to want to do that again!)  Hence, picture 6 shows me slowly and carefully removing my template from the nails and board.  I used the ruler under each row to help lift the paper and I pulled in the direction the nail heads pointed.  If you do not want to save your template, just remove it from the board without disturbing your nails.
  8. Finally, decorate if you would like!  I hot glued a narrow pink and white dotted ribbon around the edge of mine.  Apart from ribbon, consider gluing buttons, adding stickers, rhinestones, or glitter...whatever floats your boat.
Once again, I hope my instructs are clear.  Obviously, feel free to make this project your own.  Go bigger.  Go brighter!  Do whatever suits your needs best.  :)

Until next time!

Tuesday, February 21, 2012

What Time Has Not Forgotten


It is a wee bit embarrassing that I have failed to do anything with this blog since I created it back in November.  Fortunately, while I may not have been posting, I have certainly been crafting.  I should, therefore, have enough fodder for several posts (which I'll hopefully actually write!)


Today's craft project is brought to you by my husband's 29th birthday (which was incidentally also in November).  I was inspired by the bucket list projects and things I have seen.  I wanted to create something similar for my husband, but with a slight twist.  Instead of creating a list of things for him to do in his lifetime, I created a list for him to complete before he turns 30.  The idea behind this being that this is the last year he should do stupid twenties things (for example, staying up all night).  I also included a lot of couple-y things to do (like going to a winery and going to the theater).

30 Before 30 Challenge


Making this was really easy.  The hardest part, actually, was coming up with 30 things to put on the list!


Supplies needed:
A large, empty frame
Ribbon in fun colors/patterns
Clothespins
Paper
Glue
Labels (Optional)

Process:
As picture 2 shows, I hot glued the ribbon to the back of the frame.  I used several different types of ribbon to create a fun, somewhat funky look (picture 3).

After coming up with my list, I wrote each item down on a label (picture 4) and then attached it to a piece of paper (I used scrapbook paper) I glued to a clothespin.  You don't need to use labels, you can just write on the paper if you prefer...I just happened to have a ton of labels lying around.

Finally, I put each clothespin on the ribbon.  As my husband completes each thing on the list, I will take a picture and add it that clothespin.  By his next birthday, this frame should be covered with pictures!

I hope my instructions aren't too confusing.  This project was fun because it's all about individualization.

Happy Crafting!